There’s something deeply satisfying about turning your front yard into a full-blown Halloween graveyard. Maybe it’s the way neighbors slow down to look. Maybe it’s the scream from a kid who didn’t see the motion-activated skeleton. Or maybe it’s just the pride of knowing you put in the effort when everyone else settled for a plastic pumpkin.
Whatever your reason, a well-executed Halloween graveyard scene is one of the most iconic, dramatic, and genuinely fun ways to decorate for October 31st. Whether you’re a first-timer with ten bucks and a borrowed shovel, or a seasoned haunter who starts planning in August, this guide gives you everything — ideas, layouts, materials, lighting tricks, prop hacks, and the kind of small details that take a yard from “cute” to “actually creepy.”
Why a Halloween Graveyard Works So Well as Front Yard Decor
Not every Halloween decoration concept translates from a photo to a real yard. Fog machines without barriers just drift away. Elaborate animatronics need power sources. Giant inflatables collapse in the wind.
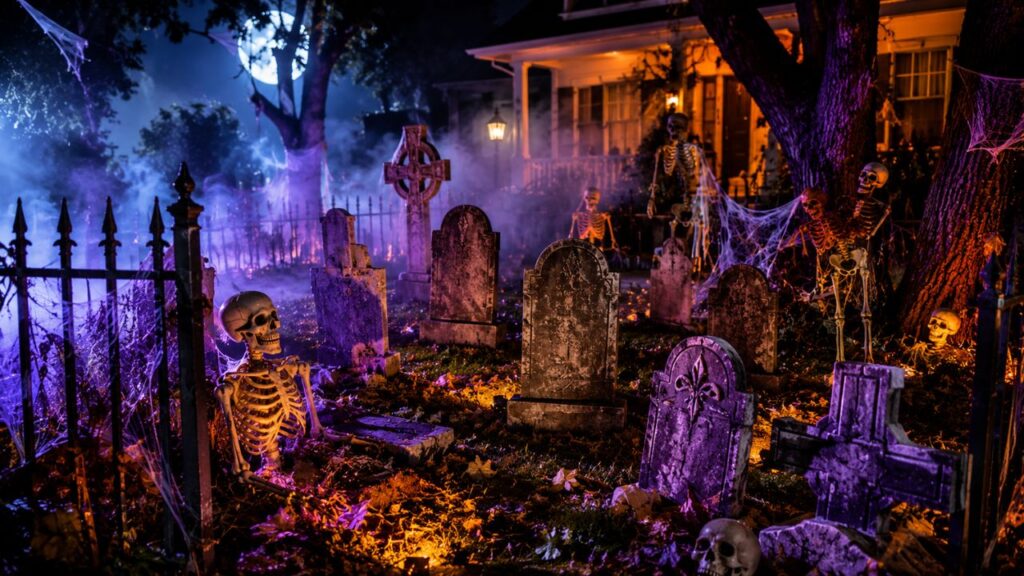
But a Halloween graveyard? It works. It scales up or down with your budget. It looks cohesive whether you have 3 tombstones or 30. It photographs well at night. And it interacts naturally with the landscape — uneven ground, dead grass, leaf litter, and bare tree branches all add to the effect rather than fighting it.
A front yard Halloween graveyard is also one of those rare setups where imperfection plays in your favor. Crooked tombstones look more authentic. Slightly sunken fake graves look more disturbing. The messier the better, within reason.
Planning Your Halloween Graveyard: Start With the Layout
Before you buy a single prop or drive a single stake into the ground, think about your layout. The best halloween graveyard ideas share a few common structural principles.
Work With Your Existing Landscape
Mature trees, shrubs, and even utility boxes can become part of the scene. A big oak tree becomes the focal point. A row of hedges becomes the cemetery wall. A garden bed becomes an overgrown, forgotten grave plot.
Walk your yard in the evening (ideally with a flashlight) and notice what creates shadow, what naturally draws the eye, and where foot traffic flows on Halloween night. Trick-or-treaters will follow a path — use that to your advantage and put your best scares along the route.
Depth and Layers Matter
Flat decorations lined up against a fence look like a store display. A real halloween graveyard scene has depth: some tombstones close to the sidewalk, some in the middle distance, and maybe a large feature piece or silhouette at the back.
Use elevation too. A tombstone on a slight rise looks dramatic. A grave that sits slightly lower, as if the ground has settled, looks genuinely unsettling.
Create a Defined Perimeter
One of the easiest upgrades to any front yard halloween graveyard is a defined border. This signals to the eye that the space is intentional — a cemetery, not just some props in the grass. Options include:
- Plastic fencing from Halloween stores (the black wrought-iron-style pieces)
- Real rope or chain strung between wooden posts
- Stacked stones or bricks if you want to go full DIY
- Dead branches laid end-to-end for a more organic feel
- Painted landscape edging for a clean-but-spooky look
DIY Halloween Graveyard: Making Tombstones That Don’t Look Cheap
Here’s where most graveyard setups succeed or fail: the tombstones. Pre-made foam tombstones from discount stores are fine as a starting point, but they’re instantly recognizable, flimsy in wind, and fade fast. If you have any DIY inclination at all, making your own is worth it.
Materials for DIY Tombstones
Foam insulation board (the pink or grey 2-inch rigid foam from hardware stores) is the gold standard for DIY halloween graveyard tombstones. It’s cheap, easy to cut with a serrated knife or hot wire tool, lightweight enough to transport, and takes paint well.
Plywood works for a more durable, permanent option. It’s heavier, which is a plus in windy areas, but requires more tools to shape.
Cardboard is fine for one-season use, especially if you seal it well. Spray a few coats of sealant and it’ll hold up for a week of October weather.
Shapes to Cut
Classic arched tombstones are always a good starting point. But consider mixing in:
- Obelisk shapes (tall and narrow)
- Cross shapes
- Broken tombstones (cut a jagged top edge)
- Flat slabs partially “sunken” into the ground
Variety in shape makes the halloween cemetery feel more authentic and less like a prop row.
Painting Technique for Realistic Stone Look
This is the step most people skip, and it shows. Here’s a quick technique that works:
- Base coat in dark grey — cover the whole surface
- Dry brush lighter grey over raised edges and the face of the stone to simulate wear
- Add green and brown washes in the recessed areas to suggest moss and age
- Spatter technique — thin some black or dark brown paint and flick it onto the surface for a speckled, weathered look
- Seal everything with matte spray varnish
This process takes maybe 30 minutes per tombstone and the difference versus unpainted foam is dramatic.
Epitaphs: The Text on Your Tombstones
This is where you get to have fun. Some classics that always land well with trick-or-treaters:
- “Here lies Al Dente. He never finished what he started.”
- “R.I.P. Hugh Jass”
- “Gone but not forgiven”
- “I told you I was sick”
- “She had more lives than a cat. She used them all.”
- “Beloved father. Terrible driver.”
Mix genuinely creepy epitaphs (“She watches still”) with the punny ones. It gives the halloween graveyard scene personality and gives visitors something to read and remember.
Front Yard Halloween Graveyard Ideas: Full Setups That Work
Here are several complete front yard halloween graveyard ideas, ranging from minimal to max-effort, to give you a real starting point.
The Classic Churchyard (Budget-Friendly)
Perfect for smaller yards or first-time builders. Five to eight tombstones, a string of small orange or purple lights along the fence, a few artificial ravens or black crows placed on top of the tallest stones, and a ground-level fog machine if you have one. Total cost: $40–$80 if you DIY the tombstones.
What makes it work: cohesion. Everything is in the same color palette (black, grey, dark purple, orange). The tombstones vary in height. There’s at least one element of movement — even just wind catching a piece of cheesecloth.
The Abandoned Cemetery Scene
This one leans into overgrown, neglected aesthetics. Rake your leaves into the graveyard area instead of away from it. Add dead branches and sticks as a perimeter fence. Use a faded, cracked paint treatment on the tombstones. Include a weathered wooden sign: “Eternal Rest Cemetery — Est. 1683.”
Optional centerpiece: a large “mausoleum” structure built from cardboard boxes, painted grey, with a fake iron door. It sounds ambitious but a dedicated afternoon gets it done.
The Horror Movie Graveyard
For the enthusiast who wants the full halloween cemetery experience. This involves:
- Ground fog from a low-lying fogger (not a standard machine — the chiller-type units keep fog low to the ground)
- Multiple animatronic props: a rising corpse, a shaking coffin, a motion-activated screaming skull
- Uplighting with colored LEDs (green and purple work best)
- A soundtrack — thunder, distant screaming, creaking chains — played through a weatherproof speaker
- Detailed props: a shovel stuck in a mound of dirt, a rusted lantern, a discarded boot
This is the halloween graveyard setup that stops cars.
The Minimalist Night Cemetery
Sometimes restraint is scarier. A completely dark yard with just three or four high-quality tombstones, lit by single candles (real pillar candles inside glass lanterns for safety) and a soft green uplight from a buried LED. No inflatables, no fake cobwebs, no cartoon ghosts. Just silence, shadow, and the suggestion that something happened here.
This works especially well if you have a naturally atmospheric yard — big trees, uneven ground, maybe a garden with dark mulch.
Halloween Graveyard Decorations: The Props That Matter Most
Beyond the tombstones themselves, it’s the supporting halloween graveyard decorations that take a setup from good to genuinely impressive.
Ground-Level Details
- Fake dirt mounds — garden soil or topsoil piled into mound shapes and covered with dead leaves or brown-dyed straw
- Grave markers — smaller, weathered wooden stakes with names written in black marker
- Bones and skulls scattered naturally (not lined up — random is more disturbing)
- Discarded “digging” props — an old shovel, a pickaxe, dirt-covered work gloves
Height and Silhouette
- Skeletal trees — either dead real branches or artificial tree props, placed at corners or behind main tombstone groupings
- Hanging props — crows, lanterns, or “hanging bodies” (cheesecloth figures) from real or artificial branches
- Gate structures — even a simple arched gate made from PVC pipe and black spray paint dramatically improves front yard graveyard ideas
Lighting
Get this right and everything else looks better. Halloween graveyard decorations depend heavily on lighting for their effect.
Green and purple LEDs work best for a cemetery atmosphere — they suggest decay and otherworldliness without being “fun.” Warm orange or amber works for a more classic, vintage feel.
Uplighting from below ground level is more effective than downlighting. Bury small stake lights beside tombstones, pointing up. The under-lighting effect is inherently more unsettling than overhead light.
Avoid white lights. They flatten the scene and make everything look like a party rather than a haunting.
Consider shadows. Place a light source behind a skeletal tree to project its shadow onto a wall or fence. The shadow will always be larger and more dramatic than the prop itself.
Halloween Cemetery Ideas: Themes to Build Around
Rather than a generic Halloween graveyard scene, consider committing to a specific thematic direction. This focus makes prop decisions easier and gives the whole setup a more professional, curated feel.
Victorian Gothic Cemetery
Wrought-iron fence sections, elaborate arched tombstones, ivy draped over everything (real or fake), ornate crosses. Color palette: grey, black, deep burgundy, gold accents. Think Sleepy Hollow or a Tim Burton film. This aesthetic is timeless and photographs beautifully.
Ancient Egyptian Necropolis
More unusual, and genuinely dramatic. Hieroglyphic-style text on flat-slab tombstones. A painted sarcophagus propped against a wall. Torches (battery-operated flame props). Wrapped mummy figures. Sand-toned spray paint on everything. This halloween cemetery theme stands out because most people don’t expect it.
Medieval Plague Cemetery
Hasty wooden grave markers. Burlap-wrapped bundles suggesting quickly buried bodies. A monk silhouette. “God Have Mercy” painted onto wooden signs. This one leans darker and less campy — not for everyone, but memorable.
Classic Hollywood Monster Cemetery
A mashup of famous classic monster iconography: “Count Dracula — Impaled Here,” “Dr. Frankenstein’s Monster — Still Out There,” “The Wolf Man — Buried at Silver Crossroads.” For pop culture fans, this is a fun nod that visitors will appreciate.
Front Yard Graveyard Ideas: Solving Common Problems
Real yards present real challenges that stock photo setups don’t mention.
What to Do With a Flat, Featureless Yard
A completely flat yard without trees or terrain makes it hard to add depth. Compensate with:
- Artificial fog to obscure the flatness and add mystery
- Varied prop heights — some tombstones on risers, boxes, or slight earth mounds
- A strong perimeter to frame and define the space
- Backlighting from the house to create silhouette effects against the facade
What to Do When You Rent and Can’t Stake the Ground
Many apartment dwellers or renters can still do a front yard halloween graveyard setup. Use:
- Weighted bases — fill sandbags or large planters and attach tombstones to them
- Potted “grave” planters — dead plants in weathered pots, labeled with names
- Container setups — a long window box or trough filled with dark soil, tombstones inserted upright
- Porch-focused graveyard — smaller scale, but completely achievable on a covered stoop
Wind Issues
Wind is the enemy of most Halloween graveyard decorations. Solutions:
- Use weighted or staked tombstones
- Avoid anything with large, flat surfaces that catch wind
- Tie lightweight props to fixed points with thin fishing line (nearly invisible at night)
- For fog effects, plan for wind direction — always fog across the yard path, not against the prevailing breeze
Graveyard Halloween Decorations on a Budget
The most expensive components of a full halloween graveyard setup tend to be animatronics and lighting. You can skip both if budget is a concern and still have a remarkable display.
$0–$20 range: Cardboard tombstones painted with leftover house paint, dead branches collected from the yard, candles from the dollar store. Completely free if you have paint already.
$20–$60 range: Foam tombstone DIY project (foam board + paint), plastic fencing from a Halloween store, one fog machine from Amazon, a string of purple LED lights.
$60–$150 range: Multiple foam tombstones, quality lighting, one or two animatronics from Spirit Halloween or similar retailers, a ground fog machine, decorative gate.
$150+ range: Full scene with multiple animatronics, professional-grade fog equipment, custom-built props, audio system, perimeter fencing.
Even at the lowest budget tier, the key is commitment to the theme and the quality of execution. A few really well-made tombstones beat twenty sloppy ones every time.
Safety and Practical Considerations
A halloween graveyard scene that injures a trick-or-treater or causes a tripping accident isn’t just bad for them — it’s a real liability for you.
- Mark all stakes and low-to-ground wiring with reflective tape or glow sticks
- Keep the walking path clear — don’t put props where people need to walk
- Anchor all tombstones so they can’t fall on young children
- Use battery-operated candles for any props with candle flame effects
- Check extension cord ratings for outdoor use before plugging in
- Don’t use real fire near synthetic materials like cheesecloth or plastic
FAQ: Halloween Graveyard Questions Answered
Q: How far in advance should I set up my Halloween graveyard? Most people set up 1–2 weeks before Halloween. Earlier than that and weather can degrade cardboard or paper props. If you’re using foam, earlier is fine.
Q: What’s the best material for DIY tombstones? Rigid foam insulation board is the best all-around choice for DIY halloween graveyard tombstones. It’s cheap, easy to cut, lightweight, and takes paint well.
Q: How do I keep tombstones from falling over? Use rebar stakes driven into the ground, attached to the back of the tombstone with zip ties. For foam tombstones, a wooden stake glued or screwed to the back works well.
Q: What kind of fog machine works best for a Halloween cemetery? Standard fog machines work fine for general atmosphere. For a true ground-hugging effect (the “walking on clouds” look), you need a chiller-style fog machine or a fog chiller attachment. These cool the fog before it exits so it stays low.
Q: Are there any plants that work well in a Halloween graveyard scene? Dead or dying plants are perfect — don’t throw them away before Halloween! Black mondo grass, dusty miller, dark-leafed heuchera, or ornamental kale in dark colors all look great. Twisted willow branches or any structural dead branches are excellent.
Q: How do I make my graveyard scene visible at night? Lighting is everything at night. Ground-level uplighting on tombstones, colored LED strips behind props for silhouette effects, and battery candles in lanterns scattered around the scene all help. Avoid white light — it kills atmosphere.
Q: What’s a good focal point for a front yard Halloween graveyard? A large centerpiece prop works best: a mausoleum structure, an oversize tombstone, a realistic animatronic, or an elaborate gate entrance. Something the eye goes to first, that establishes the scale and quality of the setup.
Quick Comparison: DIY vs. Store-Bought Halloween Graveyard Props
| Factor | DIY Tombstones | Store-Bought Props |
|---|---|---|
| Cost | $2–$8 each | $10–$40 each |
| Customization | Full control | Limited |
| Durability | Depends on material | Usually foam, moderate |
| Setup time | More | Less |
| Visual impact | Higher (if done well) | Variable |
| Uniqueness | High | Low |