
I get it. You’ve been scrolling through Pinterest, bookmarking gorgeous backyard setups with stone counters, sizzling grills, and that perfect outdoor bar. And then reality hits: a custom outdoor kitchen costs as much as a decent used car. Or more. But there’s a quiet shift happening in backyard design, and it’s called RTA outdoor living. It’s not a trend that’s going to fade when the next HGTV show ends. It’s a smarter, faster, and far more affordable way to get the outdoor kitchen you actually want—without hiring a general contractor to drain your savings.
I stumbled into the RTA outdoor world about four years ago after quoting a traditional masonry island. The number on the estimate made me laugh, then cry. A friend mentioned ready-to-assemble outdoor kitchen cabinets, and I was skeptical. Would they look cheap? Would they fall apart after one rainy season? I ordered a sample door, then a full island kit. I’ve since built two RTA outdoor kitchens, and I’ve helped a handful of neighbors do the same. This isn’t a theoretical “maybe this works” type of article. It’s the real-deal, sweat-on-the-brow, cocktail-after-install kind of guide.
We’re going to walk through everything: design, planning, cabinet selection, appliance pairing (hello, Coyote outdoor living), real RTA outdoor living reviews, and the little tricks nobody tells you until you’re halfway through assembly. By the end, you’ll know whether rta outdoor kitchen projects are right for your space, and you’ll have a clear map to start.
What Exactly Is RTA Outdoor Living?
If you’ve ever assembled an IKEA bookshelf, the core concept won’t shock you. RTA stands for “ready to assemble.” In the context of rta outdoor, it refers to outdoor kitchen cabinets, bars, islands, and sometimes pergolas that arrive flat-packed and require homeowner assembly. But don’t picture flimsy particle board. The best RTA outdoor cabinets are built from marine-grade HDPE polymer, powder-coated aluminum frames, or high-density polyethylene—materials that laugh at rain, sun, and spilled barbecue sauce.
The beauty of RTA living is that it removes the most painful, expensive part of outdoor kitchen construction: custom framing, stucco, stonework, and endless subcontractor delays. You choose a layout from outdoor kitchen plans, order the modules, and assemble them over a weekend. It’s not “cheating.” It’s building with modern materials that outperform wood and hold up better than many site-built options.
When I talk about outdoor kitchen RTA, I’m really talking about a shift in control. You’re no longer waiting six weeks for a mason to show up. You’re not paying a 30% markup on materials. You’re the project manager, and honestly, that’s empowering.
Why RTA Outdoor Cabinets Are Changing the Game
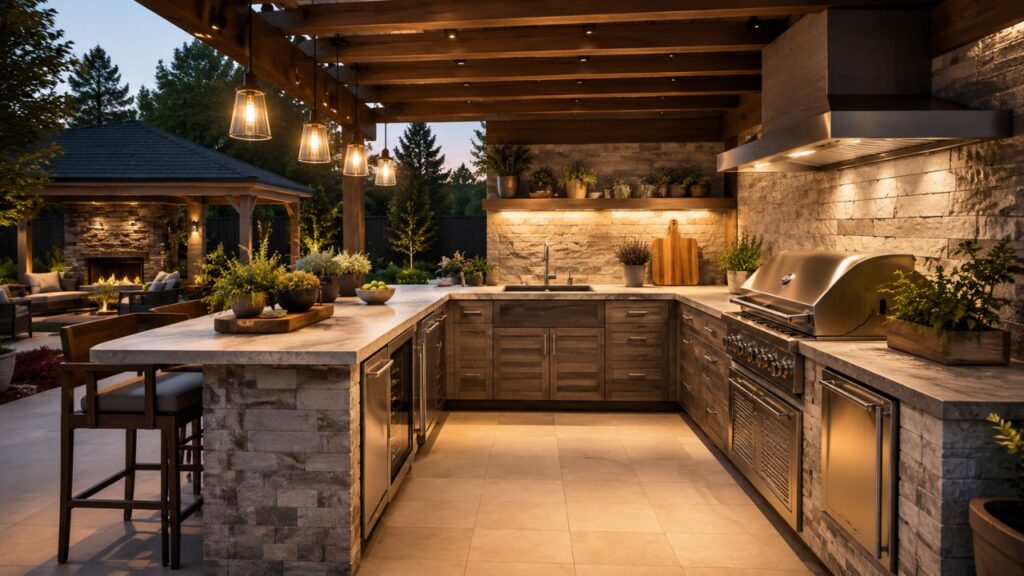
Traditional outdoor kitchens are framed with pressure-treated wood, covered in cement board, and then faced with stone veneer or stucco. That works, but it’s labor-heavy and unforgiving if you ever want to change the layout. RTA outdoor cabinets flip the script. The cabinets themselves are the structure. They’re modular, so you can add a trash bin pull-out or a double-access door later without demo work.
Here’s what really matters: the best RTA cabinets are built from materials that don’t rot, warp, or invite termites. Most use high-density polyethylene (HDPE) panels with a UV-stabilized finish. The color goes all the way through, so a scratch won’t reveal a different shade underneath. Doors hang on stainless steel hinges, and the cabinets can support granite or concrete countertops without additional framing.
I’ve personally tested panels left outside through two Ohio winters and a punishing August. No fading, no swelling. The only maintenance is an occasional wipe-down with soapy water. That’s the kind of durability that makes you wonder why we ever built outdoor kitchens out of wood.
Designing Your Space: Outdoor Kitchen Designs That Actually Work
Before you click “add to cart,” spend some time on the layout. Too many people get excited about outdoor kitchen design and immediately go too big or too cramped. Your outdoor kitchen needs to breathe. It needs a work triangle—grill, sink, prep space—just like an indoor kitchen. If you’re working with a small patio, a 5-foot linear run with a grill, an access door, and a small fridge might be perfect. For larger spaces, an L-shape or U-shape island creates a natural gathering spot.
When I sketch out outdoor kitchen designs for friends, I always start with function, not aesthetics. Ask yourself: Do I need a dedicated pizza oven nook? A raised bar top for seating? Will the grill be built-in or freestanding? Answering those questions shapes your cabinet configuration. The easiest way to begin is by grabbing a tape measure, marking out the footprint with cardboard or hoses, and walking through the motions of cooking a meal. Sounds dorky, but it works.
I’ve seen people jump straight to a fancy design only to realize their fridge door bangs into a column. A little mockup time saves a lot of regret. And if you’re stuck, many RTA suppliers offer free design review if you send them your measurements. Use that. It’s free expertise.
From Blueprint to Backyard: Outdoor Kitchen Plans You Can Steal
Not everyone wants to design from scratch. That’s where pre-made outdoor kitchen plans come in. Several RTA cabinet brands offer layout guides with exact dimensions, parts lists, and 3D renderings. You can literally pick a 7-foot straight island plan and have everything you need in one shipment.
If you’re going the DIY route with free plans, here are three classic setups that almost always work:
- The Straight Run (6–8 feet): Grill center, a door/drawer combo left, and a paper towel/trash pull-out right. Fridge under the counter. This is the no-fuss setup for couples who grill a few times a week.
- The L-Shape with Bar Height: One leg holds the grill and sink, the other becomes a raised bar top for seating. Great for parties.
- The U-Shape Entertainer: Full surround with a grill, side burner, refrigerator, and kegerator. It’s ambitious but entirely doable with RTA modules.
When evaluating outdoor kitchen plans, check the cutout dimensions for your specific appliances. Not all 30-inch grills fit the same opening. This is where outdoor kitchen builder mistakes happen—assuming universal sizing. I’ve had friends order a beautiful island only to find their grill required a ⅛-inch trim that, of course, was impossible with polymer panels. Measure twice, order once.
To Hire or Not to Hire: Finding the Right Outdoor Kitchen Builder
Here’s the honest truth: most RTA outdoor kitchen systems are designed so you don’t need a professional outdoor kitchen builder. With basic tools—a drill, rubber mallet, level, and maybe a second pair of hands—you can assemble a typical 7-foot island in a day. The instructions are generally good, and everything is pre-drilled.
But life happens. Maybe you hate assembling furniture. Maybe you have a tricky deck with uneven slopes, or you want an elaborate setup with undercounter lighting, a sink plumbing run, and a natural gas hookup. In those cases, hiring a local outdoor kitchen builder familiar with RTA products can save your sanity. Some contractors specialize in assembling RTA islands because they can knock out a project in two days and move on. You still save on material costs; you’re just paying for labor and expertise.
If you go the builder route, ask to see photos of previous RTA installs. Not all contractors understand that polymer panels don’t get nailed like wood. The right builder will use the cam-lock system and adjust leveling feet before dropping on a heavy stone top. The wrong one will try to “reinforce” things and create issues you didn’t have before.
Spotlight: Coyote Outdoor Living and Its Appliance Ecosystem
No outdoor kitchen is complete without solid appliances, and that’s where Coyote outdoor living enters the picture. Coyote has carved out a reputation for giving you premium features—ceramic briquette flavorizers, 304 stainless steel construction, interior lighting—without the premium price tag you’d see from luxury names. I’ve cooked on a Coyote 36-inch built-in grill for three summers now, and it still lights on the first click.
Coyote outdoor appliances cover way more than just grills. They offer side burners, double access doors, refrigerators, kegerators, and even teppanyaki flat tops. What I appreciate is their focus on fit and finish. The control knobs feel weighty, the hood glides down smoothly, and the flame is even edge to edge. For an RTA outdoor kitchen, pairing Coyote with polymer cabinets makes a ton of sense because the appliance cutouts are standardized and well-documented.
A full coyote outdoor kitchen setup might include a built-in grill, a double side burner, a matching access door for propane tank storage, and an outdoor-rated compact fridge. The look is sleek and commercial-grade. I’ve seen enough backyard builds to know that appliances are where people feel the most sticker shock. Coyote hits the sweet spot—serious performance for about 40% less than comparable brands.
When selecting coyote appliances, always check the BTU output on the side burner if you plan to boil crawfish or deep-fry outside. Their Power Burner option can crank out 60,000 BTUs, which is wok-cooking territory. Also, their grill grates are heavy stainless rod, not thin wire, so you get great sear marks.
Real Talk: RTA Outdoor Living Reviews and What Homeowners Actually Say
I’ve read through dozens of rta outdoor living reviews across forums, retailer sites, and YouTube. The sentiment is overwhelmingly positive, but with a few consistent themes. Here’s the distilled truth.
What people love:
- Speed of assembly—most report a weekend install.
- Material durability—many reviews mention cabinets surviving harsh winters uncovered.
- Cost savings—typically 50–70% less than custom masonry.
- Modern, clean aesthetic that doesn’t scream “DIY.”
What people gripe about:
- Cam lock assembly can be finicky if you misalign a panel.
- Color variation between batches if you order add-on pieces later.
- Weight of countertops requiring extra hands.
I also make a habit of digging into rta outdoor living reviews posted a year or two after install. Those long-term impressions are gold. Over time, owners consistently say the cabinets still look new, doors close tight, and they’d do it again. Some even expand their islands with extra modules—which is the modular promise delivered.
A Picture’s Worth: Browsing RTA Outdoor Living Photos for Ideas
Before I ordered my first cabinet set, I spent hours going through rta outdoor living photos in customer galleries and social media tags. It’s one thing to see a polished product shot on a white background. It’s another to see a real deck with string lights, a dog bowl under the island, and a slightly crooked picture frame on the bar top. That realness builds confidence.
Looking at rta outdoor living photos also clarifies how different countertop materials pair with cabinet colors. White marine-grade cabinets with a dark granite top? Classic. A bold teal cabinet with a concrete slab? Very Palm Springs. You’ll notice in customer photos that the modular seams are almost invisible when the island is loaded with bar stools and planters. The photos also reveal smart add-ons: paper towel holders mounted inside cabinet doors, magnetic knife strips on the grill surround, and LED tape lights under the countertop overhang.
I always advise people to search hashtags like #rtaoutdoorliving and #rtaoutdoorkitchen on Instagram—not for the influencers, but for the everyday homeowners who share the messy mid-assembly shots. Those tell the real story.
Step-by-Step: Assembling Your RTA Outdoor Kitchen Without Losing Your Mind
When your rta outdoor kitchen pallets arrive, the boxes will look intimidating. Take a breath. Inventory everything first. The hardest part is often just getting started. Here’s my battle-tested process:
- Prep the pad. You need a flat, level surface—concrete patio, pavers, or a well-compacted gravel base. The cabinets have adjustable leveling feet, but you’re not building a ship in a bottle. The flatter the ground, the happier you’ll be.
- Lay out panels by section. Each cabinet module will have a bottom, top, back, and sides. Match the cam lock posts to the pre-drilled holes.
- Tighten cam locks gently. Turn until you feel firm resistance, then maybe a quarter turn more. Over-tightening can crack HDPE, though it takes some muscle.
- Join modules together. Use the provided joining plates to bolt cabinets side-by-side. This creates one rigid island structure.
- Level, level, level. Adjust the feet until a bubble level shows perfection front-to-back and side-to-side. Neglect this step and your granite top could crack under its own weight.
- Drop appliances in place. Slide them into their cutouts, then secure with mounting brackets if required.
- Countertop day. Have helpers. Stone fabricators can install the top, but you can also use concrete forms or oversized porcelain slabs. Seal natural stone thoroughly.
I timed my second build: 4.5 hours for a 6-foot island with two people, not including countertop. That’s a Saturday morning. By Saturday evening, we were grilling.
RTA Outdoor vs. Custom Masonry: A Quick Comparison Table
| Feature | RTA Outdoor Cabinets | Custom Masonry & Stud Framing |
|---|---|---|
| Material | Marine-grade HDPE, aluminum frames | Wood studs, cement board, stone veneer |
| Assembly Time | 1–2 days DIY | 3–6 weeks with contractor |
| Cost (6-ft island) | $2,500–$5,000 (cabinets only) | $8,000–$15,000+ |
| Water/Insect Resistance | Excellent, no organic materials | Vulnerable if not fully sealed |
| Future Modification | Modular, can reconfigure | Requires demolition |
| Weight Bearing | Supports stone with proper support | Very sturdy if engineered correctly |
| DIY Friendliness | High, designed for homeowner assembly | Low, requires skilled labor |
The math is pretty clear for most people. You’re trading some perceived “permanence” for speed, cost savings, and flexibility. After living with both, I’d choose RTA every time.
Expanding the Vision: More Ways to Embrace RTA Outdoor Living
Rta outdoor isn’t just about the grill island. The same RTA concept shows up in pergolas, cabanas, and outdoor storage. I’ve seen clever homeowners use outdoor kitchen RTA base cabinets to build a dedicated potting bench, a poolside towel storage unit, or a bar facing the fire pit. Because the cabinets are weatherproof and modular, you can create a cohesive outdoor living room where everything matches.
Full rta living goes beyond cabinets. It’s a philosophy of curating your outdoor space with the same intention as your indoor rooms—but doing it yourself, on your timeline. Think RTA deck tiles, DIY pergola kits, and modular seating. The less you have to rely on specialized labor, the more budget you have for great appliances and comfortable furniture.
Common Mistakes I See (And How to Avoid Them)
I’ve made a few of these myself, so no judgment.
- Ignoring ventilation requirements. Built-in grills need proper venting. If your island is fully enclosed, you must install vent panels. Most RTA lines offer louvered vent doors.
- Forgetting about power. That outdoor fridge and LED tape light need GFCI outlets. Run conduit under the slab or tuck a weatherproof box behind the island.
- Choosing the wrong counter overhang. If you want bar seating, plan for a 12–15 inch overhang. You’ll need corbels or steel supports if the slab is thin.
- Skipping the cover. Yes, the cabinets are weatherproof, but a breathable cover keeps pollen and bird mess off your pristine island.
FAQ
Are RTA outdoor kitchen cabinets really waterproof?
Yes, the HDPE polymer used in quality rta outdoor cabinets is completely waterproof and won’t absorb moisture. Just make sure you’re buying from a reputable brand that uses marine-grade materials.
Can I install a stone countertop on RTA cabinets?
Absolutely. Most outdoor kitchen design plans assume a granite, quartzite, or concrete top. The cabinets can support the weight, especially when leveled properly.
How do coyote appliances integrate with RTA cabinetry?
Coyote outdoor kitchen appliances use standard cutout dimensions, so they slide into RTA openings without modification. Always download the spec sheet from Coyote before ordering your cabinets.
What’s the realistic lifespan of an RTA outdoor kitchen?
With minimal care, expect 15–20 years or more. The UV-stabilized color and stainless hardware hold up extremely well. Many owners report their outdoor kitchen rta setups look new after a decade.
Do I need a permit for an RTA outdoor kitchen?
Usually not for a freestanding island, but if you’re running permanent gas lines or a sink drain, your municipality may require an inspection. Check local code.
Can I add to my RTA island later?
Yes, modular rta outdoor cabinets let you extend an island or add a bar section down the road. Order from the same batch if possible to avoid slight color shifts.
Final Thoughts: Building Confidence Along With Your Kitchen
I still remember standing in my backyard, drill in hand, staring at a pile of flat-packed panels and thinking, “What have I gotten myself into?” Four hours later, I had a solid island frame, and the feeling was pure pride. That’s what RTA outdoor living offers that a contractor can’t—the sense that you built this. You made the design choices. You turned a stack of boxes into a place where friends gather, where you flip burgers on a Tuesday night, where life slows down a little.
The outdoor kitchen industry is shifting, and homeowners are waking up to the fact that you don’t need to spend a fortune to get a high-end look. With smart outdoor kitchen plans, quality coyote outdoor appliances, and thoughtfully chosen RTA outdoor cabinets, you can create a space that’s both beautiful and uniquely yours.
So grab a tape measure, sketch your layout, and start browsing those rta outdoor living photos for inspiration. The hardest part is clicking “order.” After that, you’re just a weekend away from the backyard you’ve always wanted.